> ## Documentation Index
> Fetch the complete documentation index at: https://tensorfuse.io/docs/llms.txt
> Use this file to discover all available pages before exploring further.
# Understanding Multi GPU Communication and Nvidia NCCL for finetuning models
export const AuthorBio = ({name, role, imageSrc}) => ;
March 14, 2025
When training machine learning models on multiple GPUs, fast communication between those GPUs is essential. NVIDIA’s Collective Communication Library (NCCL)
is a software library that makes this communication efficient. It’s the invisible engine behind the scenes in frameworks like PyTorch (e.g.
PyTorch Distributed Data Parallel) and fine-tuning tools like Axolotl, allowing GPUs to work together as a team. In this post, we’ll break down what NCCL
does, why it’s critical for multi-GPU training, and how to tackle one of its common challenges – the dreaded “watchdog timeout” error.
 ## What is NCCL and Why Is It Important?
NCCL (pronounced “Nickel”) stands for NVIDIA Collective Communication Library. It’s a library
optimized for NVIDIA GPUs that handles collective operations – things like broadcasting a tensor to all GPUs,
or summing up (reducing) gradients from all GPUs during training . In multi-GPU training (single machine or across multiple machines),
frameworks use NCCL to coordinate these operations. For example, PyTorch’s Distributed Data Parallel (DDP) uses NCCL by default to synchronize
gradients across GPUs each training step. Tools like Axolotl, which help fine-tune large language models on multi-GPU setups, rely on NCCL under
the hood to make sure all GPUs stay in sync. Without NCCL (or a similar library), scaling training to multiple GPUs would be painfully slow or
complex – you’d lose the performance benefits of having extra GPUs.
## How NCCL fits into your ML Stack ?
How NCCL fits into your ML stack: NCCL runs as a layer below the ML framework. When your training script needs to do a collective
operation (say, an all-reduce of gradients), it hands it off to NCCL. NCCL then figures out the best way to transfer the data between GPUs
– whether that’s within the same server via high-speed GPU links or across the network to GPUs in another server. It abstracts away the low-level de
tails of GPU communication (PCIe transfers, network packets, etc.) and presents a simple interface for the upper layers to use.
## What is PCIe and how it affects NCCL performance?
PCIe (Peripheral Component Interconnect Express) is a high-speed connection standard that allows computer components like GPUs
to communicate with each other. PCIe topology refers to how these components are physically connected within a computer system.
This topology significantly affects NCCL performance because the physical path that data takes between GPUs determines communication
speed.
When GPUs share **direct connections through the same PCIe switch (PIX)**, they can communicate faster than when data must travel
through **multiple bridges (PXB)** or **through the CPU (PHB)**. The slowest scenario occurs when GPUs are connected to different CPU sockets (NUMA nodes),
requiring data to traverse inter-socket links. NCCL is designed to be topology-aware, automatically detecting these connections and choosing optimal
communication paths, but its performance is ultimately limited by the underlying hardware configuration. For GPU-intensive machine learning workloads,
systems with direct GPU-to-GPU connections through PCIe switches or even faster NVLink connections will deliver superior performance compared to systems where
GPUs must communicate through the CPU or across different NUMA nodes.
## Meet NVLink: A Faster Way for GPUs to Talk
While PCIe is a general-purpose interface that GPUs use to talk to the CPU and each other, NVLink is NVIDIA’s dedicated high-speed
interconnect for GPU-to-GPU (and GPU-to-CPU in some systems) communication. Think of PCIe as a highway that all devices share,
whereas NVLink is like a private high-speed bridge directly between GPUs. NVLink provides much higher bandwidth than PCIe
and lower latency, which can dramatically speed up multi-GPU training when enabled.
### How much faster is NVLink?
For example, NVLink 3.0 (used in NVIDIA A100/H100 GPUs) offers up to 600 GB/s of total bandwidth between GPUs (when you sum across
multiple NVLink lanes). In contrast, PCIe 4.0 x16 tops out around \~32 GB/s in each direction. Even PCIe 5.0 (\~63 GB/s each way) can’t
match NVLink’s throughput. NVLink essentially allows GPUs to exchange data at memory-like speeds. It’s also bidirectional and can
support cache coherence in certain systems (like NVIDIA’s DGX servers or IBM Power systems), meaning GPUs can access each other’s memory more seamlessly.
From a practical standpoint, if your GPUs have NVLink connections (like dual-RTX 3090s with an NVLink bridge, or GPUs in an NVIDIA DGX
system with NVLink/NVSwitch), NCCL will prefer to send data over NVLink rather than PCIe. This usually prevents the timeout issues
because the data transfer for collectives can complete much faster. It’s like giving your GPUs a dedicated express lane for chatter, instead
of a congested highway.
## What is NCCL and Why Is It Important?
NCCL (pronounced “Nickel”) stands for NVIDIA Collective Communication Library. It’s a library
optimized for NVIDIA GPUs that handles collective operations – things like broadcasting a tensor to all GPUs,
or summing up (reducing) gradients from all GPUs during training . In multi-GPU training (single machine or across multiple machines),
frameworks use NCCL to coordinate these operations. For example, PyTorch’s Distributed Data Parallel (DDP) uses NCCL by default to synchronize
gradients across GPUs each training step. Tools like Axolotl, which help fine-tune large language models on multi-GPU setups, rely on NCCL under
the hood to make sure all GPUs stay in sync. Without NCCL (or a similar library), scaling training to multiple GPUs would be painfully slow or
complex – you’d lose the performance benefits of having extra GPUs.
## How NCCL fits into your ML Stack ?
How NCCL fits into your ML stack: NCCL runs as a layer below the ML framework. When your training script needs to do a collective
operation (say, an all-reduce of gradients), it hands it off to NCCL. NCCL then figures out the best way to transfer the data between GPUs
– whether that’s within the same server via high-speed GPU links or across the network to GPUs in another server. It abstracts away the low-level de
tails of GPU communication (PCIe transfers, network packets, etc.) and presents a simple interface for the upper layers to use.
## What is PCIe and how it affects NCCL performance?
PCIe (Peripheral Component Interconnect Express) is a high-speed connection standard that allows computer components like GPUs
to communicate with each other. PCIe topology refers to how these components are physically connected within a computer system.
This topology significantly affects NCCL performance because the physical path that data takes between GPUs determines communication
speed.
When GPUs share **direct connections through the same PCIe switch (PIX)**, they can communicate faster than when data must travel
through **multiple bridges (PXB)** or **through the CPU (PHB)**. The slowest scenario occurs when GPUs are connected to different CPU sockets (NUMA nodes),
requiring data to traverse inter-socket links. NCCL is designed to be topology-aware, automatically detecting these connections and choosing optimal
communication paths, but its performance is ultimately limited by the underlying hardware configuration. For GPU-intensive machine learning workloads,
systems with direct GPU-to-GPU connections through PCIe switches or even faster NVLink connections will deliver superior performance compared to systems where
GPUs must communicate through the CPU or across different NUMA nodes.
## Meet NVLink: A Faster Way for GPUs to Talk
While PCIe is a general-purpose interface that GPUs use to talk to the CPU and each other, NVLink is NVIDIA’s dedicated high-speed
interconnect for GPU-to-GPU (and GPU-to-CPU in some systems) communication. Think of PCIe as a highway that all devices share,
whereas NVLink is like a private high-speed bridge directly between GPUs. NVLink provides much higher bandwidth than PCIe
and lower latency, which can dramatically speed up multi-GPU training when enabled.
### How much faster is NVLink?
For example, NVLink 3.0 (used in NVIDIA A100/H100 GPUs) offers up to 600 GB/s of total bandwidth between GPUs (when you sum across
multiple NVLink lanes). In contrast, PCIe 4.0 x16 tops out around \~32 GB/s in each direction. Even PCIe 5.0 (\~63 GB/s each way) can’t
match NVLink’s throughput. NVLink essentially allows GPUs to exchange data at memory-like speeds. It’s also bidirectional and can
support cache coherence in certain systems (like NVIDIA’s DGX servers or IBM Power systems), meaning GPUs can access each other’s memory more seamlessly.
From a practical standpoint, if your GPUs have NVLink connections (like dual-RTX 3090s with an NVLink bridge, or GPUs in an NVIDIA DGX
system with NVLink/NVSwitch), NCCL will prefer to send data over NVLink rather than PCIe. This usually prevents the timeout issues
because the data transfer for collectives can complete much faster. It’s like giving your GPUs a dedicated express lane for chatter, instead
of a congested highway.
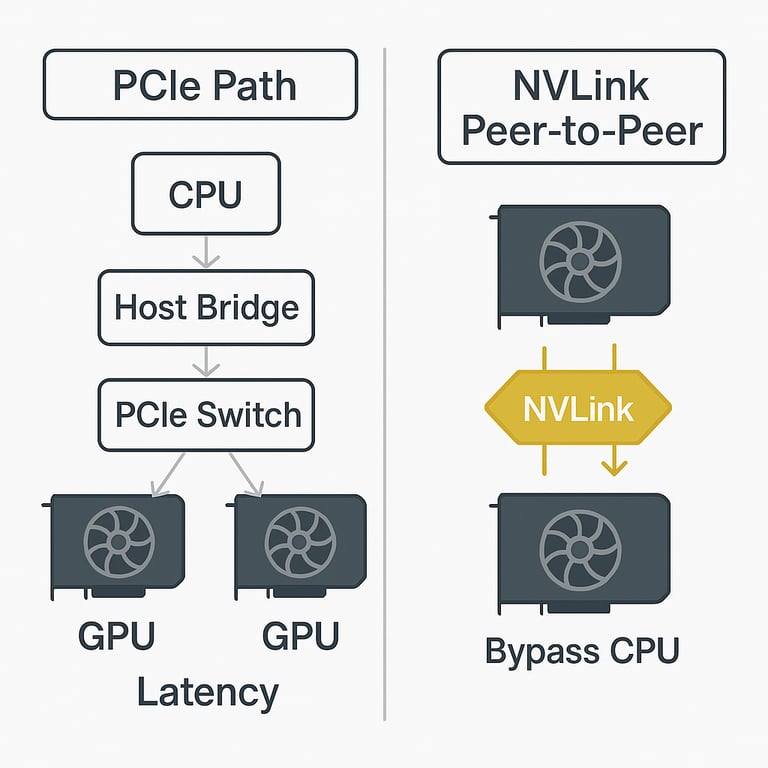 Without NVLink, GPUs must communicate via the PCIe hierarchy – data often travels up to the CPU (host bridge) and down through a PCIe
switch to reach another GPU (white/gray arrows). This adds latency and uses the CPU’s memory bandwidth. On the right, with NVLink, the GPUs
have a direct peer-to-peer link (gold arrows) and can send data to each other without involving the CPU. This direct connection greatly
increases bandwidth and bypasses the bottleneck of the PCIe bus . In multi-GPU training, enabling NVLink means collective operations
like all-reduce can happen over these faster links, making timeouts far less likely.
Without NVLink, GPUs must communicate via the PCIe hierarchy – data often travels up to the CPU (host bridge) and down through a PCIe
switch to reach another GPU (white/gray arrows). This adds latency and uses the CPU’s memory bandwidth. On the right, with NVLink, the GPUs
have a direct peer-to-peer link (gold arrows) and can send data to each other without involving the CPU. This direct connection greatly
increases bandwidth and bypasses the bottleneck of the PCIe bus . In multi-GPU training, enabling NVLink means collective operations
like all-reduce can happen over these faster links, making timeouts far less likely.
## What is the NCCL Watchdog Timeout?
Even though NCCL is highly optimized, you might encounter a situation where your training job hangs or runs extremely slowly,
eventually crashing with a scary message like this:
```text theme={null}
Watchdog caught collective operation timeout: WorkNCCL(SeqNum=42, OpType=ALLGATHER, Timeout(ms)=1800000) ran for 1806948 milliseconds before timing out.
```
This timeout error is a common pain point in multi-GPU training. Essentially, one of the collective operations (in the example above,
an ALLGATHER operation) did not complete within the expected timeframe (around 30 minutes by default). A “watchdog” in the training process noticed
the stall and aborted the operation.
### Why would an NCCL operation time out?
Usually because the communication between GPUs got stuck or slowed down so much that it couldn’t finish the data exchange in time. All GPUs
in the group must participate in these collectives – if one GPU is lagging (e.g. waiting for data), others wait as well. Symptoms of this problem
often include GPUs being at near 100% utilization but doing less work than expected (e.g. lower power usage or progress than normal) . In Axolotl
or PyTorch training logs, you’d see no progress for a long time before the error appears.
Common causes of NCCL timeouts include:
* **Suboptimal GPU interconnect** – The GPUs might be communicating over a slow path (for example, through the CPU and system memory) instead of a direct high-speed link.
* **PCIe bottlenecks or OS settings** – Some system features can inadvertently funnel GPU-to-GPU traffic through slower routes. For instance, PCIe Access Control Services (ACS) is a feature that,
when enabled, can force PCIe traffic to go via the root complex (CPU) for security checks. This means even GPUs on the same PCIe switch might not talk to each other directly, slowing everything down.
(NVIDIA actually recommends disabling ACS for better performance if possible .)
* **Driver or hardware issues** – In rare cases, driver bugs or unsupported GPU features (e.g. certain consumer GPUs not supporting peer-to-peer transfers) can cause hangs.
* **Legitimate long operations** – Occasionally, you might intentionally be running a very large collective that really needs more than the default 30 minutes. In such a case, the watchdog is
just too impatient (we’ll cover how to extend the timeout later).
The key is that a timeout almost always indicates a **communication holdup**.
## Enabling NVLink in Your Training Setup
If your system has NVLink-capable GPUs, you should ensure that it’s actually being used during training. NCCL will
usually detect NVLink and use it automatically, but it can sometimes fall back to PCIe due to configuration issues or if the NVLink
isn’t set up. Here are some practical steps for Axolotl/PyTorch users:
* **Verify NVLink is active**: Run the command nvidia-smi nvlink --status. This will output the status of NVLink
connections for each GPU, including their link speeds. For example, on a system with NVLink you might see something like:
```text theme={null}
GPU 0: NVIDIA H100
Link 0: 250 GB/s - Active
Link 1: 250 GB/s - Active
...
GPU 1: NVIDIA H100
Link 0: 250 GB/s - Active
Link 1: 250 GB/s - Active
...
```
* **Force NCCL to prefer NVLink**: By default NCCL should use NVLink when available, but to be safe you can set an environment variable
to force it. In your environment (or training script launch), set:
```bash theme={null}
export NCCL_P2P_LEVEL=NVL
```
`NCCL_P2P_LEVEL=NVL` tells NCCL to use peer-to-peer communication for GPU pairs that have NVLink connections. Essentially, it raises the
“cutoff” to NVLink level, ensuring NCCL doesn’t fall back to slower paths. If NVLink isn’t available, NCCL will automatically fall back
to PCIe. (Other possible values for NCCL\_P2P\_LEVEL include PIX, PXB, PHB, etc., which correspond to the topologies we described earlier –
but NVL is the highest speed option.)
* **Check your library versions**: Make sure you have a recent NCCL version and NVIDIA drivers, especially if using newer GPUs. NVLink
support and performance can improve with newer NCCL releases. Axolotl installations typically use whatever NCCL comes with PyTorch, but it never hurts
to keep your CUDA toolkit/driver up to date.
Once NVLink is enabled and NCCL is using it, you should notice that large data transfers (like model all-reduce operations) happen much
faster, and the risk of hitting the 30-minute timeout drops dramatically. If you still encounter timeouts with NVLink on, then the issue might
lie elsewhere (for example, a true hang or bug).
With these tips, you should be well-equipped to both understand and troubleshoot NCCL in your multi-GPU endeavors. The key takeaways
are: know your hardware topology, use the fastest interconnects available (NVLink when you can), and don’t hesitate to turn on debug info
when things go wrong. Multi-GPU training can be tricky, but with the right configuration, your GPUs will communicate like best friends –
and your Axolotl fine-tuning runs (or any distributed training jobs) will be all the smoother for it!
Without NVLink, GPUs must communicate via the PCIe hierarchy – data often travels up to the CPU (host bridge) and down through a PCIe
switch to reach another GPU (white/gray arrows). This adds latency and uses the CPU’s memory bandwidth. On the right, with NVLink, the GPUs
have a direct peer-to-peer link (gold arrows) and can send data to each other without involving the CPU. This direct connection greatly
increases bandwidth and bypasses the bottleneck of the PCIe bus . In multi-GPU training, enabling NVLink means collective operations
like all-reduce can happen over these faster links, making timeouts far less likely.
## What is the NCCL Watchdog Timeout?
Even though NCCL is highly optimized, you might encounter a situation where your training job hangs or runs extremely slowly,
eventually crashing with a scary message like this:
```text theme={null}
Watchdog caught collective operation timeout: WorkNCCL(SeqNum=42, OpType=ALLGATHER, Timeout(ms)=1800000) ran for 1806948 milliseconds before timing out.
```
This timeout error is a common pain point in multi-GPU training. Essentially, one of the collective operations (in the example above,
an ALLGATHER operation) did not complete within the expected timeframe (around 30 minutes by default). A “watchdog” in the training process noticed
the stall and aborted the operation.
### Why would an NCCL operation time out?
Usually because the communication between GPUs got stuck or slowed down so much that it couldn’t finish the data exchange in time. All GPUs
in the group must participate in these collectives – if one GPU is lagging (e.g. waiting for data), others wait as well. Symptoms of this problem
often include GPUs being at near 100% utilization but doing less work than expected (e.g. lower power usage or progress than normal) . In Axolotl
or PyTorch training logs, you’d see no progress for a long time before the error appears.
Common causes of NCCL timeouts include:
* **Suboptimal GPU interconnect** – The GPUs might be communicating over a slow path (for example, through the CPU and system memory) instead of a direct high-speed link.
* **PCIe bottlenecks or OS settings** – Some system features can inadvertently funnel GPU-to-GPU traffic through slower routes. For instance, PCIe Access Control Services (ACS) is a feature that,
when enabled, can force PCIe traffic to go via the root complex (CPU) for security checks. This means even GPUs on the same PCIe switch might not talk to each other directly, slowing everything down.
(NVIDIA actually recommends disabling ACS for better performance if possible .)
* **Driver or hardware issues** – In rare cases, driver bugs or unsupported GPU features (e.g. certain consumer GPUs not supporting peer-to-peer transfers) can cause hangs.
* **Legitimate long operations** – Occasionally, you might intentionally be running a very large collective that really needs more than the default 30 minutes. In such a case, the watchdog is
just too impatient (we’ll cover how to extend the timeout later).
The key is that a timeout almost always indicates a **communication holdup**.
## Enabling NVLink in Your Training Setup
If your system has NVLink-capable GPUs, you should ensure that it’s actually being used during training. NCCL will
usually detect NVLink and use it automatically, but it can sometimes fall back to PCIe due to configuration issues or if the NVLink
isn’t set up. Here are some practical steps for Axolotl/PyTorch users:
* **Verify NVLink is active**: Run the command nvidia-smi nvlink --status. This will output the status of NVLink
connections for each GPU, including their link speeds. For example, on a system with NVLink you might see something like:
```text theme={null}
GPU 0: NVIDIA H100
Link 0: 250 GB/s - Active
Link 1: 250 GB/s - Active
...
GPU 1: NVIDIA H100
Link 0: 250 GB/s - Active
Link 1: 250 GB/s - Active
...
```
* **Force NCCL to prefer NVLink**: By default NCCL should use NVLink when available, but to be safe you can set an environment variable
to force it. In your environment (or training script launch), set:
```bash theme={null}
export NCCL_P2P_LEVEL=NVL
```
`NCCL_P2P_LEVEL=NVL` tells NCCL to use peer-to-peer communication for GPU pairs that have NVLink connections. Essentially, it raises the
“cutoff” to NVLink level, ensuring NCCL doesn’t fall back to slower paths. If NVLink isn’t available, NCCL will automatically fall back
to PCIe. (Other possible values for NCCL\_P2P\_LEVEL include PIX, PXB, PHB, etc., which correspond to the topologies we described earlier –
but NVL is the highest speed option.)
* **Check your library versions**: Make sure you have a recent NCCL version and NVIDIA drivers, especially if using newer GPUs. NVLink
support and performance can improve with newer NCCL releases. Axolotl installations typically use whatever NCCL comes with PyTorch, but it never hurts
to keep your CUDA toolkit/driver up to date.
Once NVLink is enabled and NCCL is using it, you should notice that large data transfers (like model all-reduce operations) happen much
faster, and the risk of hitting the 30-minute timeout drops dramatically. If you still encounter timeouts with NVLink on, then the issue might
lie elsewhere (for example, a true hang or bug).
With these tips, you should be well-equipped to both understand and troubleshoot NCCL in your multi-GPU endeavors. The key takeaways
are: know your hardware topology, use the fastest interconnects available (NVLink when you can), and don’t hesitate to turn on debug info
when things go wrong. Multi-GPU training can be tricky, but with the right configuration, your GPUs will communicate like best friends –
and your Axolotl fine-tuning runs (or any distributed training jobs) will be all the smoother for it!